Before hardwiring your dash cam, you need to understand your vehicle’s electrical system and capacity to avoid overloads. Choose the right wiring kit with fuse taps or power converters suited for your model. Proper installation involves hiding cables neatly along the headliner or pillars, and using professional help if unsure. Managing electrical load and safety is essential to prevent fuse blowouts or damage. Keeping these points in mind will help guarantee a secure, efficient setup — and there’s more to learn below.
Key Takeaways
- Ensure the dash cam’s power requirements match your vehicle’s electrical system capacity.
- Use appropriate fuse taps or power converters to prevent electrical overloads.
- Route wiring neatly along the headliner, A-pillars, or under the dashboard to avoid distractions.
- Understand your vehicle’s electrical system to prevent overloading circuits and causing damage.
- Consider professional installation for proper wiring, safety, and to maintain vehicle warranty.
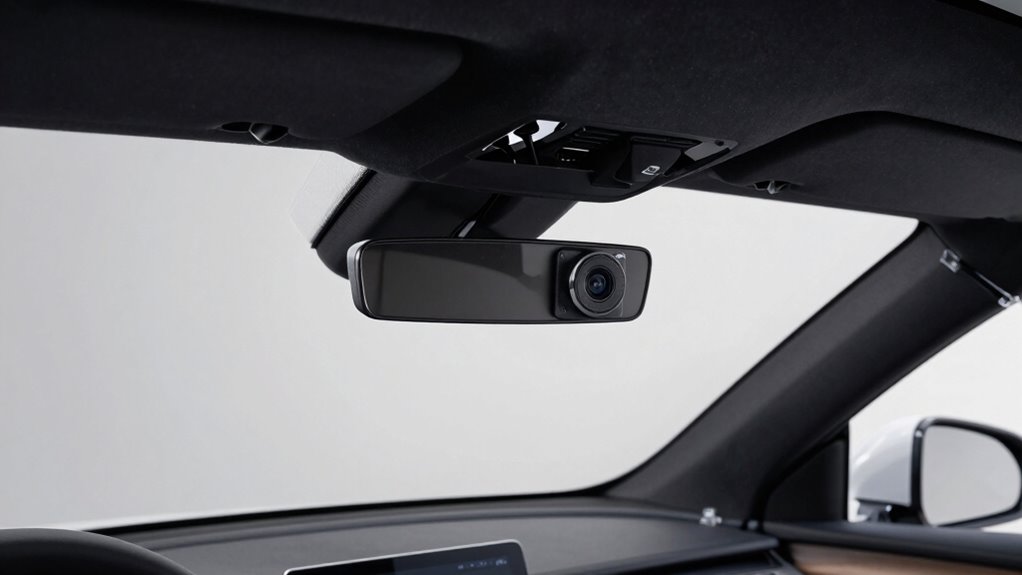
Next, consider how your dash cam’s power consumption impacts your vehicle’s electrical system. Most dash cams are designed to operate efficiently, but high-resolution models or those with additional features like GPS or Wi-Fi can draw more power. When you hardwire the device, it’s essential to use an appropriate fuse tap or power converter to prevent overloading your vehicle’s circuits. Overloading can lead to blown fuses or, in worst cases, electrical issues. If you’re unsure, consulting your vehicle’s manual or a professional installer can help you select the right wiring kit. Proper wiring also involves hiding cables neatly along the headliner, A-pillars, or under the dashboard to avoid distractions while driving. Additionally, understanding your vehicle’s electrical system can help you make informed decisions about wiring and power management. Knowing the vehicle’s electrical capacity is important to prevent potential complications. Being aware of power management techniques can further help you optimize your dash cam’s installation and operation. It’s also helpful to familiarize yourself with electrical safety principles to ensure a secure and reliable setup. For example, assessing your vehicle’s electrical load can help you avoid exceeding its capacity when adding components.

VIOFO HK4 Hardwire Kit with 8pcs Full Set Circuit Fuse Tap, Type-C Port, for A329 series/A229 series/A119Mini2/A139Pro/WM1/T130 Dash Cam
【24 Hours Parking Surveillance】When the engine is off, HK4 hardwire kit provides continuous power to the camera, any…
As an affiliate, we earn on qualifying purchases.
As an affiliate, we earn on qualifying purchases.
Frequently Asked Questions
Can I Hardwire a Dash Cam Myself Without Professional Help?
Yes, you can DIY install a dash cam, but you need to be cautious about wiring safety. Before starting, gather the right tools and follow detailed instructions to avoid damaging your vehicle’s electrical system. Confirm to disconnect the battery to prevent shorts or shocks. If you’re unsure about handling wiring, consider consulting a professional. Proper installation ensures your dash cam functions safely and effectively.
Will Hardwiring Affect My Vehicle’s Warranty?
Hardwiring your dash cam is like walking a tightrope over a stormy sea; it can impact your vehicle’s warranty. You need to take into account warranty implications and manufacturer policies, as some automakers may see hardwiring as a modification that voids coverage. Always check your vehicle’s warranty terms first. If done correctly, with proper installation, you minimize risks, but it’s wise to stay informed about those policies to avoid surprises.
What Tools Are Needed for Hardwiring a Dash Cam?
To hardwire your dash cam, you’ll need a few essential tools. Start with a power source, usually from your vehicle’s fuse box. A fuse tap is vital, as it allows you to connect the dash cam’s power wire safely to the fuse box without damaging your vehicle’s wiring. Additionally, have a multimeter, wire strippers, and electrical tape handy to guarantee secure connections and proper insulation during installation.
How Long Does the Installation Process Typically Take?
The installation time for hardwiring a dash cam typically takes around 30 minutes to an hour, depending on your experience and vehicle compatibility. If you’re comfortable with basic DIY tasks, it’s quite feasible to do yourself, but some find it easier to seek professional help. Planning ahead and following detailed instructions can help streamline the process, making it quicker and smoother for you.
Is There a Risk of Draining My Car Battery?
You might worry about battery drain, especially if you leave your dash cam plugged in for long drives. For example, a friend’s car wouldn’t start after a weekend trip because the dash cam’s power management wasn’t optimized. Hardwiring can risk draining your car battery if not done correctly, but using a voltage regulator or circuit breaker can help prevent this. Proper installation guarantees your dash cam runs without compromising your vehicle’s power.

YQMAJIM Dashcam Power Adapter,(Universal) Compatible with All Models,Dual DC Buck Converter 12V to 5V,Dash Cam Hardwire Kit,Built-in Hide USB to GPS Radar Mirror Camera Dashcam Charger Adapter Cable
【Installation Method】Use a multimeter—do not guess by wire color alone—to find the +12V and ground terminals on your…
As an affiliate, we earn on qualifying purchases.
As an affiliate, we earn on qualifying purchases.
Conclusion
Now, as you finish wiring your dash cam, imagine the sleek device silently watching over your drive, its tiny lens capturing every detail like an attentive eye. The glow of the power wire blends seamlessly into your car’s interior, a quiet guardian ready to record any unexpected moment. With everything in place, you can hit the road confidently, knowing your new eyes on the road are securely wired, always ready to record your journey’s story.

RNVEASS Dash Cam Mount, Aluminum Rearview Mirror Bracket Installation Kit, for Rove R2-4K, R2-4K PRO and R2-4K Dual Car Dash Cams
Our rearview mirror dash cam mount is made of high-quality all aluminum alloy material, with exquisite craftsmanship and…
As an affiliate, we earn on qualifying purchases.
As an affiliate, we earn on qualifying purchases.

Dash Cam Installation Kit – Trim Removal Tool, 20 Strong Adhesive Cable Clips, Reusable Cable Ties, Split Sleeve & Foam Pads – Clean Car Wire Organizer
Hide Dash Cam Wires Like a Pro: Keep your dash cam installation clean and factory-looking. This complete kit…
As an affiliate, we earn on qualifying purchases.
As an affiliate, we earn on qualifying purchases.